VTEX keeps track of users’ sessions within apps by keeping session information within a namespace. Each app owns its namespace, and only those can change its session properties. For example, vtex.search-session is responsible for the namespace search.
This guide covers the basics of how to identify session changes from a specific namespace and react to them.
Learn more about the Session manager and check the Session manager API reference.
To see a real application of session management, see the Cart cleanup guide.
Session manager API
It is easier to understand how your session is structured by seeing it. In your browser, head over to:
https://{workspace}–{accountName}.myvtex.com/api/sessions?items=*
This will show the session available for your navigation.
Only use
items=*during the discovery phase, never in production; if for some reason you need to get the user's session using this API, you can specify which namespace and property you need, i.e.,items=authentication.storeUserEmail,checkout.orderFormId.
Hands-on
Bootstrapping
The VTEX IO CLI already has a list of templates you can use to start any project, such as Services, Admin apps, React Apps, among others. If you already have an App and only want to include this feature, skip this and go to the next step.
-
Open your terminal after installing our CLI, navigate to your preferred folder, and type
vtex init.You will see the following options: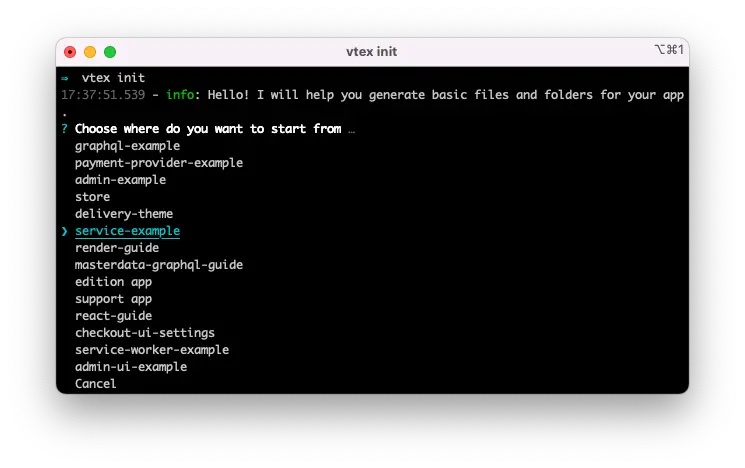
-
Using your keyboard arrow, select
service-example, pressenter/return, and confirm the folder name your project will be initiated and confirm your selection. -
Rename it to a different folder name if you want.
-
Open your project's folder and edit the
manifest.jsonfile using your favorite code editor. Make the changes tovendor,name,description, andversion. Remember that "vendor" is your account name. -
Using your terminal, enter this command:
cd YOUR_APP_FOLDER_NAME and vtex link.
That's it for your bootstrap, it should be running.
If you are not familiar with VTEX IO workspaces, please take a minute to read the Basic development setup guide for VTEX IO.
Configuring vtex.session
-
First, add
vtex.session@0.xto your manifest.json file underbuilders"Builders": { "Node": "6.x", "Docs: "0.x", "Vtex.session": "0.x" }, -
Create a folder with the same name as this builder (
vtex.session) on your project root path and add aconfiguration.jsonfile to it.
The content for this file will be an object following a specific pattern determined by the vtex.session configuration schema.
{
    "APP-NAME": {
        "input": {
            "NAMESPACE": ["VALUE"]
        },
        "output": {
            "NAMESPACE": ["VALUE"]
        }
    }
}
APP-NAME: Without vendor. For instance,session-watcher-demo.input: fixed name, its values will correspond to the session changes, and the values you need to read.output: fixed name, its values will correspond to the session change you want to apply.
Below you can see the app’s content. It will listen to changes in the authentication. At some point, we will use the orderFormId.
{
    "session-watcher-demo": {
        "input": {
            "authentication": ["storeUserEmail"],
            "checkout": ["orderFormId]
        }
        "output": {
            "public": ["demo"]
        }
    }
}
The output will set a property demo to the public namespace.
Configuring "transform" handler
vtex.session will identify your configuration file and watch for changes on the informed input; once a change is detected, it will POST the values on input to a specific endpoint. All values described under input will be sent, even if there was no change in all of them.
This endpoint needs to be public, and on the exact format /_v/APP-NAME/session/transform
- To create this endpoint, open the file
./node/services.jsonand underroutesproperty, add a handler property containingpathandpublic.
"routes": {
    "clearCart": {
        "path": "/_v/session-watcher-demo/session/transform",
        "public": true
    }
}
For this demo, call it clearCart. This uses the same name defined on the ./vtex.session/configuration.json file as the app name.
- Once the route is defined, move to
./node/index.tsand add the corresponding response for the handlerclearCart.
We recommend using a separate file to keep this
./node/index.tsfile as clean as possible for better maintainability.
- So before setting the route handler, prepare a handler function in another file. For this example, you may create
/node/resolvers/index.tsand exportresolvers.
Inside you can find Routes, and inside of it, our clearCart handler.
This handler will receive a Context that gives you access to the request body. Among other things, you should respond as a JSON with the object expected on the output definition.
It should look like the example below.

- Now that you have your handler, import it to the
./node/index.tsfile and load it to the Service.
Import { resolvers } from ‘./resolvers’
…
// Export a service that defines route handlers and client options.
Export default new Service{{
    Clients,
    Routes: resolvers.Routes,
})
Validating
Now that everything is set, link your app to a workspace and keep an eye on the terminal. Once you authenticate or log out, you should be able to see clearCart => in the terminal containing the body request.

You can also access this path to check the public namespace being changed:
https://{workspace}–{accountName}.myvtex.com/api/sessions?items=public.demo
You may see something like this:
{
    id: "cca40248-a3f9-4a60-baf1-b67de92cd8a",
  - namespaces: {
      - public: {
          - demo: {
                Value: "User Authenticated"
            }
        }
    }
}
To link the app, run this command:
vtex link
After linking, it may take a few minutes to initiate everything on the vtex.session side, do not worry if you do not see any logs in your terminal right after linking.
If you wish, you can download this complete example.
Don't forget to change the vendor in your
./manifest.jsonfile.